Passing Jenkins Workflows to Specific Nodes in Orka
An Orka cluster is an excellent way to run large numbers of resource intensive CI builds for macOS and iOS. In fact, a given cluster can easily accommodate the CI workflows of multiple teams within an organization. And with Orka’s node tagging feature, you can subdivide your cluster’s resources so that individual teams within your organization can only execute their workflows on specific nodes within the larger cluster.
Organizations may choose to do this in order to avoid bottlenecking for all teams that may occur when certain teams are running an unusually high number of jobs, for example.
Today, we’ll look at how to accomplish this for Jenkins workflows in particular. We’ll do so by creating a VM config that is restricted to certain nodes within the cluster. We can then use that same VM config when we define our Orka cloud via the Orka plugin for Jenkins, which acts as the connector between your Jenkins master and your macOS build agents that run in Orka.
Node Tagging in Orka
First, you’ll need to get the names of the nodes you’d like to isolate. To do so, you can run:
orka node list
This will return a list of the nodes in your cluster, along with some metadata related to them.
Next, we’ll tag the node we’d like to isolate jobs on. In this case, we’ll choose macpro-4 and we’ll apply the tag jenkins with the following actions via the Orka CLI:
orka node tag
Node Name: macpro-4 ✔ Done.
Tag: jenkins
With our node tagged, we can now create the config for our Jenkins build agents. First, though, we’ll need to spin up a generic VM from a provided base image and install Jenkins' dependencies, like so:
orka vm create

                    VM Name: jenkins-agent
                 Base Image: 90GBigSurSSH.img
    [CPU (2,3,4,6,8,12,24)]: 3
   [VCPU (2,3,4,6,8,12,24)]: 3
                [Node Name]:
               [Attach ISO]:
            [Attached Disk]:
                [GPU (y/N)]: N
                      [Tag]:
       [Tag Required (y/N)]: N
        [VNC Console (y/N)]: y

 Create Status: Successfully Created
 Deploy Status: Successfully deployed VM

 ID: b4202b475744c
 Connection Info
  IP: 10.221.188.16
 Ports
  VNC: 5999
  SSH: 8822
  Screen Sharing: 5900
 Other
  GPU Passthrough: disabled
We can then SSH into our new VM and install our dependencies, like so:
ssh admin@10.221.188.16 -p 8822

(admin@10.221.188.16) Password: *****
Last login: Tue Feb 16 07:48:45 2021
admin@admins-iMac-Pro ~ %
Next, we can go ahead and install Java8 with Homebrew, which we’ll have to install first:
/bin/bash -c "$(curl -fsSL https://raw.githubusercontent.com/Homebrew/install/HEAD/install.sh)"
brew tap homebrew/cask-versions
brew cask install java8
With that done, we can go ahead and save our image, like so:
orka image save

          VM ID: b4202b475744c saved
          New name: jenkins-agent.img
With that jenkins-agent.img created, we can then go ahead and create our config, which will target the node we tagged above:
orka vm create-config

                    VM Name: jenkins-example
                 Base Image: jenkins-agent.img
    [CPU (2,3,4,6,8,12,24)]: 3
   [VCPU (2,3,4,6,8,12,24)]: 3
                [GPU (y/N)]: N
               [Attach ISO]:
            [Attached Disk]:
                      [Tag]: jenkins
       [Tag Required (y/N)]: y
        [VNC Console (y/N)]: y

  Successfully Created
NOTE: we created this config with the same jenkins tag we applied to our targeted node. We also have the option of absolutely requiring that this config be spun up on that same node, or telling Orka that we’d prefer it, but if there isn’t space, for example, it can choose another node that can accommodate the VM with the Tag Required value. For our example, we’ll tell Orka that this config must be spun up on our targeted node.
Using Node Tags to Direct Jenkins Workflows
With the above in place in Orka, we’re ready to turn our attention to our Jenkins master in order to connect the master to our build environment.
To do so, we’ll need to gain access to our Jenkins dashboard and install the Orka plugin by navigating to Manage Jenkins > Manage Plugins > Available and searching for “Orka.” We can then install without restart and then navigate to Manage Jenkins > Manage Nodes and Clouds > Configure Clouds to set up our connection from the Jenkins master to the build environment in Orka.
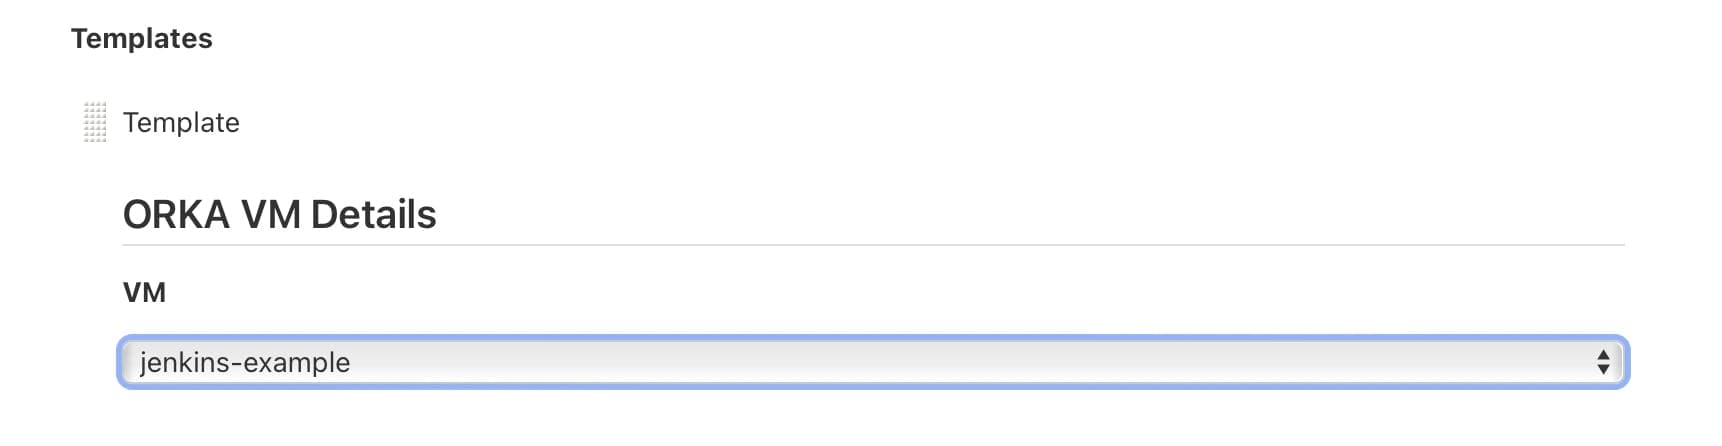
Once there, you’ll need configure the cloud to point at your Orka cluster, and in particular, you’ll need to choose the config we just made in the Templates section of the configuration view, like so:
With the above in place, all workflows that are kicked off in Orka will be directed to the node we selected above. In order to replicate this for multiple teams, you’ll need to add additional “Orka clouds” to the Jenkins master, each with its own VM config, which is – in turn – tied to a specific node. Then you can direct jobs between these “clouds” with labels as you normally would in Jenkins.
TL;DR
Orka can be leveraged as a powerful and extensible build environment for macOS and iOS application development – so powerful that it can easily accommodate workflows that are being kicked off by multiple teams within an organization. Sometimes, orgs may wish to provide individual teams with isolated build resources to avoid bottlenecking. Above, we walked through the process of configuring Jenkins to pass jobs to specific nodes within an Orka cluster to achieve exactly this.